When you first bring home an aquarium, it is incredibly easy to get swept up in the pure aesthetic joy of designing a slice of underwater paradise. But behind the shimmering glass and the graceful dance of your fish lies a fragile, artificial environment that is completely dependent on technology to survive. If you do not deploy the correct equipment, your slice of nature will rapidly shift from a thriving habitat into an aquatic graveyard.
The Core Equipment Needed for a Thriving Aquarium Ecosystem
To prevent a catastrophic aquarium collapse, you must deploy an active air pump for continuous oxygenation, a multi-stage mechanical and biological filter to eliminate toxic ammonia, an appropriately sized heater with an accurate thermometer, and a specialized liquid testing master kit to monitor invisible chemical parameter spikes on a weekly basis.
Without this foundational ecosystem support network, your fish will experience severe environmental shock, leading to sudden, heartbreaking fatalities. Every single piece of equipment you submerge or plug in serves as an artificial replacement for massive natural processes. In the wild, rivers and lakes dilute fish poop, winds oxygenate the water surface, and vast geological structures buffer the water chemistry. In your home, a 50-gallon glass box enjoys none of these natural luxuries. You are no longer just a casual pet keeper; you are the absolute custodian of a miniature closed-loop ecosystem. If one machine fails, or if you skimp on a baseline component, the entire system can crash within hours, leaving you to wonder why your fish died suddenly.
Glass vs. Acrylic: Choosing the Foundation of Your Aquatic Ecosystem
Choosing the foundation of your aquatic ecosystem begins with selecting your tank material. Fish tanks are constructed out of either glass or acrylic, and both materials carry distinct structural trade-offs that dictate how you will maintain your system for years to come. Glass remains highly popular among beginners and veterans alike because it is cheaper than acrylic, offers an incredibly clear view, and stubbornly resists surface scratches during regular cleaning. It does not discolor or turn yellow over time, meaning a glass tank looks just as pristine in year ten as it did on day one.
Furthermore, glass aquariums only require a basic, budget-friendly stand that supports the outer borders and base strips, as the rigid nature of glass prevents the bottom panel from bowing downward under water pressure. However, glass is extremely heavy, shatters or cracks easily upon heavy impact, and requires thicker panels as tank sizes scale up. This thick glass creates a noticeable green tint when viewed from the side, which subtly distorts the natural colors of your fish and live plants. If you want to bypass this color distortion, you must invest in premium, low-iron glass, which costs significantly more but restores absolute optical clarity.
Acrylic, on the other hand, is remarkably lightweight, retains water heat much better so your heater does not have to work nearly as hard, and is far more shatter-resistant than glass. Because acrylic can be seamlessly molded, it is the ideal medium for uncommon, striking tank shapes and is remarkably easy to drill for custom plumbing or DIY filtration projects. The downside is that acrylic is incredibly easy to scratch (even a tiny grain of trapped sand on your cleaning pad can leave a permanent white gouge), though small blemishes can luckily be polished out. It is more expensive than glass, gets discolored with age—which permanently reduces viewing clarity—and requires a costly, completely flat table-style stand to support its entire base to prevent structural seams from ripping open.
| Tank Material | Core Advantages | Primary Limitations | Base Support Requirement |
|---|---|---|---|
| Glass | Cheaper, scratch-resistant, no discoloration, clear view | Very heavy, shatters easily, green color tint in thick walls | Borders and base strip support |
| Acrylic | Lightweight, insulates heat, shatter-resistant, customizable shapes | Scratches instantly, ages into discoloration, more expensive | Flat, full-base table support |
To seal your ecosystem, you will require a hood to completely cover the top of the tank. Do not view the hood as an optional decorative lid. This hood acts as a critical safety barrier that prevents jump-prone fish from leaping out to their deaths and keeps household dirt, toxic airborne sprays, and dust from drifting into the water column. Hoods also provide a convenient, integrated space to mount your light bulbs while significantly reducing water evaporation (which otherwise forces you to constantly top off the tank and triggers rapid parameter swings). Depending on your aesthetic preference and budget, hoods are manufactured out of glass, plastic, wood, or metal.
Can Your Floor Actually Support the Massive Weight of a Large Fish Tank?
Because fully loaded aquariums are intensely heavy, your system must rest on a dedicated structural stand. You can easily purchase pre-made aquarium stands for smaller setups under 100 gallons, but massive systems typically require custom-built furniture. If you choose a ready-made option, it absolutely must be explicitly engineered for aquariums—never trust standard household dressers or generic TV stands, which will slowly sag and cause the aquarium seams to burst under uneven stress. Aquarium stands are built from wood, metal, or a combination of both.
Any wood used must be completely waterproof or water-resistant to survive the inevitable spills and splashes that occur during routine maintenance. While custom-built stands are significantly more expensive up front, they save you massive amounts of time and effort during your weekend chores. When designing a custom layout, you can strategically place openings, shelves, and cabinets to easily access your filtration and electrical wiring. These stands also elevate the overall look of the tank, turning a chaotic mess of wires into a seamless centerpiece.
Whether you go pre-made or custom, the stand must provide ample hidden space for wires, filters, and air pumps to keep them out of sight. Hiding these elements is an absolute requirement for large tanks, which use extensive piping and heavy machinery that can easily become an eyesore. The most vital factor when choosing a stand is calculating the total weight of the tank after it is fully equipped. You cannot just look at the empty glass box; you must add together the weight of the glass or acrylic panels, the heavy gravel or sand substrate, and all internal or external equipment. While artificial decorations are light and carry negligible weight, large natural rocks and heavy driftwood must be carefully accounted for.
Critical Weight Load Factors
- Water Weight Factor: 1 gallon of water weighs 8.34 lbs (3.78 kgs), and 1 liter of water weighs 2.20 lbs (1 kg).
- 50-Gallon Benchmark: An equipped 50-gallon tank without its stand weighs between 600 lbs to 700 lbs (272 kgs to 317 kgs).
- 100-Gallon Benchmark: Without a stand, a 100-gallon setup weighs between 1,100 lbs to 1,400 lbs (500 kgs to 635 kgs).
- 150-Gallon Benchmark: Without a stand, a 150-gallon tank weighs between 1,800 lbs to 2,300 lbs (817 kgs to 1,045 kgs).
- Stand Mass Weight: The aquarium stand alone can weigh several hundred additional pounds or kilograms depending on if it is solid oak or heavy-gauge steel.
Placing a large tank on an upper floor without calculating structural load limits can cause the floor to warp or completely cave in, resulting in catastrophic structural damage to your home. To mitigate these terrifying weight risks, large aquariums should always be placed in a corner of a room, where the floor framing and structural walls are naturally strongest. If you are keeping systems larger than 100 gallons, it is best to place them strictly on the ground floor or a concrete basement. Otherwise, you must contact your building engineers to confirm whether the floor framing can safely handle the load.
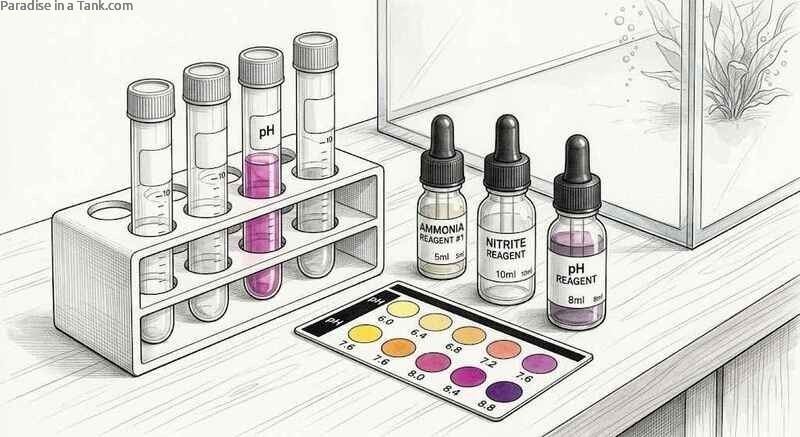
How Do You Use Water Testing Kits to Uncover Invisible Chemical Killers?
If an aquarium is not cleaned regularly, toxic ammonia, nitrites, and nitrates will build up rapidly. This is due to the accumulating aquarium bioload, which is the total waste production of your livestock compared to the volume of water. Because these chemical compounds are completely invisible to the naked eye, they will stay undetected while looking deceptively clean—until your fish suddenly die out of nowhere. Depending on their evolutionary history, different fish species also require specific water hardness and alkalinity levels to survive. Therefore, you must test your water parameters weekly using liquid testing kits.
Critical Water Parameter Risks
- Ammonia Risk: Highly poisonous waste excreted through fish poop, rotting food, and fish gills where free ammonia acts as the most toxic form.
- Nitrite Risk: The secondary byproduct of the ecosystem cycle, which is equally dangerous to fish health because it suffocates fish from the inside out.
- Nitrate Risk: High concentrations cause chronic stress, weaken the immune system, trigger diseases, cause severe algae blooms, and halt breeding.
- Water Acidity Stability Risk: Measures water acidity or alkalinity, requiring regular monitoring because sudden shifts cause fatal environmental shock.
- Carbonate Hardness Buffer: Measures dissolved carbonates and bicarbonates, acting as a shock absorber to guarantee a stable, crash-resistant alkalinity level.
- General Hardness Parameter: Measures dissolved calcium and magnesium ions, which must be matched precisely to soft-water or hard-water species requirements.
- Copper Contamination Risk: Tested when actively using copper-based medications to ensure therapeutic levels stay accurate without accidentally poisoning the tank.
Investing in a master liquid test kit is the most efficient way to keep all your essential tests on hand at a lower cost per test, with everything sharing the same expiration date. The primary downside is that you cannot customize the tests included. Additionally, like multi-pack printer ink cartridges, combo kits tend to run out of one specific testing bottle long before the others. Still, keeping a liquid master kit on hand is highly recommended over inaccurate paper test strips that warp easily in household humidity.

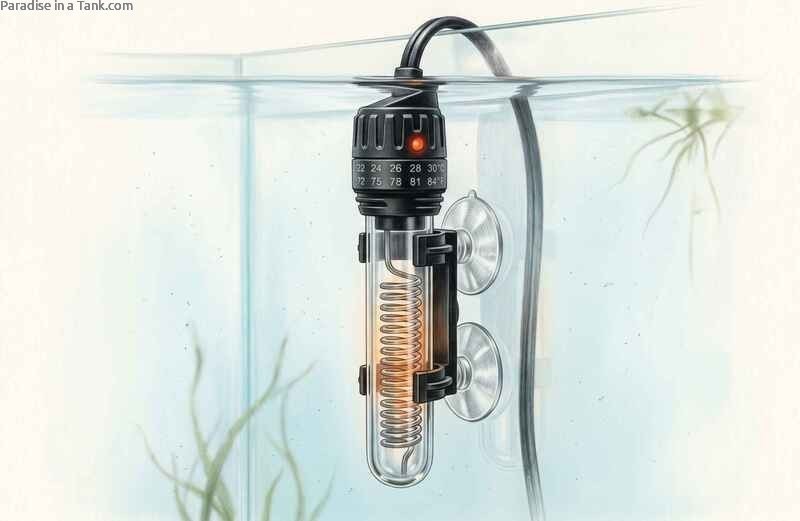
How Do Heaters and Thermometers Prevent Fatal Thermal Shock?
Aquarium thermometers are severely underrated and frequently left out of beginner setups, which is a massive mistake. Having a thermometer allows you to track water temperature regularly so you can make immediate adjustments before disaster strikes, which is especially critical when managing aquarium fish care in winter. Rapid fluctuations in water temperature stress the fish. When an animal experiences thermal stress, its immune system becomes less effective at fighting off pathogens, making the fish get sick easily.
Avoid cheap over-the-glass sticker thermometers and floating glass thermometers, as both are notoriously inaccurate. Because they are cheap, the materials used to sense temperature are not sensitive enough, and they face physical barriers like room air temperature or constant water flow movement that skew readings. Instead, buy a submersible thermometer or a unit equipped with a digital probe. Submersible models are placed entirely underwater inside the tank, while probe units keep the digital display outside while the wire probe sits submerged below the water surface for high accuracy.
For maximum effectiveness, always place your thermometer at the exact opposite end of the tank from where your heater is located. If it is placed right next to the heater, it will read the warmed water radiating off the element while cold, stagnant dead spots form at the far end of the aquarium. To completely eliminate cold spots, you must position your heater where the water flow is strongest, utilizing filters and powerheads to constantly push warmed water away from the element and across the tank. If you run a large tank of 50 gallons or more, you should install two separate heaters placed at opposite ends to ensure even heating and provide a fallback safety net if one fails.
Aquarium Heater Variations
- Submersible and Hanging Heaters: Submersibles sit entirely underwater, while hanging models hook onto the plastic rim with elements sealed in glass or plastic tubes.
- Substrate Heaters: Positioned completely under the substrate to promote healthy plant root growth, though they cannot warm the open water column alone.
- In-Line Heaters: Placed externally inside your filtration tubing to heat water inside an enclosed cylinder on its way back to the tank.
- Filter Heaters: Convenient, high-end canister or power filters that feature integrated heaters built directly into the filter body to warm the water stream.
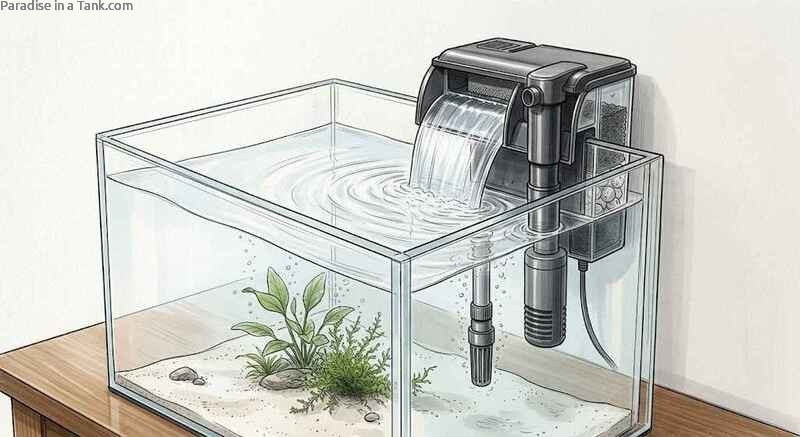
Mechanical, Biological, and Chemical Filtration: How Do They Work?
A filter helps keep the water crystal clear and the tank physically clean. However, you cannot view a filter as a simple mechanical trap; it relies on a three-pronged biological, chemical, and physical defense system to keep your water non-toxic. Mechanical filtration physically removes solid floating particles from the water column, trapping things like fish poop and uneaten food inside filter media like a sponge or dental floss. While it clarifies the water and adds air through surface circulation, mechanical filtration alone is completely insufficient because it does nothing to reduce pre-existing toxic chemical waste levels.
You must rinse your mechanical filter media using only old aquarium water every one to two weeks, ensuring you leave a small part of the media slightly dirty. Washing it completely clean under the sink or using chlorinated tap water will instantly kill your beneficial bacteria. Biological filtration is the single most critical process keeping your fish alive, running what is known as the nitrogen cycle. Beneficial bacterial colonies live fixed onto surfaces like gravel, rocks, sand, filter media, and live plants. Specialized bacteria break down toxic waste gas into mid-stage compounds, and secondary colonies break down those dangerous elements into far more tolerable final compounds, which are safely consumed by live plants and algae.
These beneficial bacteria require massive amounts of oxygen to thrive. You can maximize their surface area inside the filter by adding specialized plastic bio balls or ceramic rings. Chemical filtration removes airborne pollution, cooking fumes, and household chemical sprays that enter the aquarium through the water’s surface. This filtration style is most commonly executed using activated carbon packed inside the filter body to pull dissolved contaminants and foul odors out of the water.
Choosing Your Filtration Hardware
- Sponge Filters: Highly inexpensive but connected to an external air pump, making them ideal for breeding or hospital tanks where gentle suction is required.
- Hang-On-Back Power Filters: Highly common external filters that hang from the tank rim, routing water through mechanical, chemical, and biological cartridges.
- Canister Filters: Large, high-capacity external units that pressurize and force water rapidly through heavy media, making them the premier choice for large tanks.
- Undergravel Filters: Hidden plates placed beneath the substrate that draw solid waste down, requiring regular vacuuming to prevent dangerous gas pockets.
- Internal Corner Filters: Cheap, small filters stuck to the inner corner glass using suction cups, perfect for small tanks under 30 gallons.
- Wet/Dry Sump Filters: Ultimate biological powerhouses sitting inside an external aquarium sump container to drastically slash your required water change volumes.
- Fluidized Bed Filters: High-pressure external cylinders packed with ultra-fine media that fluidizes under a pump, requiring almost zero routine maintenance.
What Secondary Support Systems Keep Your Tank Aerated, Lit, and Clean?
An air pump is arguably the most critical piece of baseline hardware you can buy for your fish tank. They actively draw in air from the surrounding room and force it into the tank through airline tubing, acting as the primary source of fresh air for your livestock. They must be left running constantly 24/7. Furthermore, foundational tools like sponge filters and undergravel filters cannot physically function without an attached air pump driving their suction.
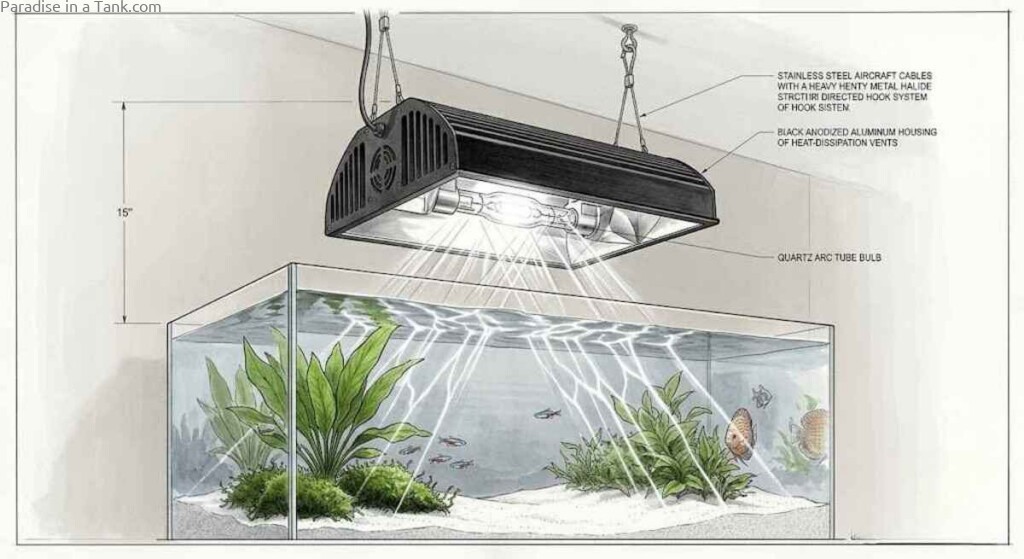
Aquarium lighting is required to view your fish, but it plays a life-or-death role if you choose to grow live plants. Normal fluorescent bulbs are cheap, energy-efficient, and come standard with most starter tanks. High output bulbs emit intense light evenly throughout the habitat with built-in systems to mitigate heat. Power compact lights are smaller, highly energy-efficient fluorescent variants. Metal halide lamps are incredibly powerful, expensive bulbs that cast a deeply focused beam capable of penetrating deep into massive aquariums, but they emit intense heat, forcing you to install a water chiller.
Premium LED lights are the gold standard; while expensive up front, they have the longest lifespan, consume minimal electricity, emit zero heat, and feature adjustable color spectrums to skyrocket plant growth or make your fish’s colors pop beautifully. You can even run them as faint blue night moonlights to observe fascinating nocturnal behaviors without disrupting their day-night cycle. Your choice of gravel size is vital—always choose stones large enough that they cannot physically fit inside your fish’s mouth to prevent accidental swallowing fatalities. Gravel acts as a physical trap, gathering loose solid waste between the stones to keep the water clear. During your weekly water changes, using a dedicated gravel cleaner is highly efficient. These tools operate like little underwater vacuum cleaners, sucking up trapped waste directly without kicking up cloudy, muddy debris into the water column.
Actionable Maintenance Toolkit
- Fish Net: Must be wide and deep enough to scoop out your target fish easily without tangling delicate fins or tails in the mesh.
- Dedicated Bucket: Keep a bucket strictly reserved for fish use only, cleaning it using only fresh water and never household soaps.
- Magnetic Glass Cleaner: A genius glass sandwich design where an inner scrubbing pad and an outer handle grip lock together using strong magnets.
- Razor and Plastic Blades: Used to slice tough algae or hard calcium crusts off the inner glass walls without scratching delicate surfaces.
- Algae Pads & Scrapers: Used to gently clean off algae film spreading across rocks, artificial decorations, and slow-growing vegetation.
- Plant Trimmers: Specialized scissors engineered to cleanly slice away dead leaves or clip back and shape dense underwater foliage.
- Soft Cloth: Essential for wiping down drips and fingerprints on the external glass or acrylic faces without leaving fine scratches.
How Do Sumps and Powerheads Maximize Water Volume and Circulation Speed?
Sumps are external containers placed beneath the aquarium inside the cabinet where water drains from the main tank, passes through equipment, and is pumped right back up. While they require extensive plumbing to set up, they offer unmatched convenience, letting you conceal messy heaters, massive filters, and chemical media entirely out of sight. The true genius of a sump is that it vastly increases the total water volume of your overall system, even if the display tank itself is relatively small. This larger body of water massively dilutes dangerous substances, completely stops water parameters from swinging rapidly, and prevents your fish from experiencing lethal environmental shock, granting you a much wider window of time to correct chemistry errors.
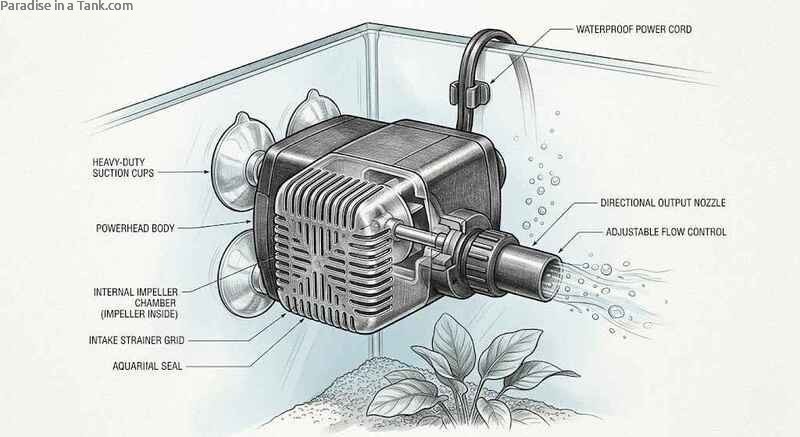
Powerheads are compact, submersible pumps placed below the water line that forcefully push concentrated streams of water into the aquarium. They are deployed to increase water circulation speed, which accelerates oxygen distribution and eliminates dangerous cold or hot spots by mixing the water column perfectly. They also provide excellent exercise to keep active fish healthy, as many species enjoy pushing through the current. Alternatively, you can deploy wavemakers, which generate strong, broad water currents without pushing unsightly air bubbles into the view.
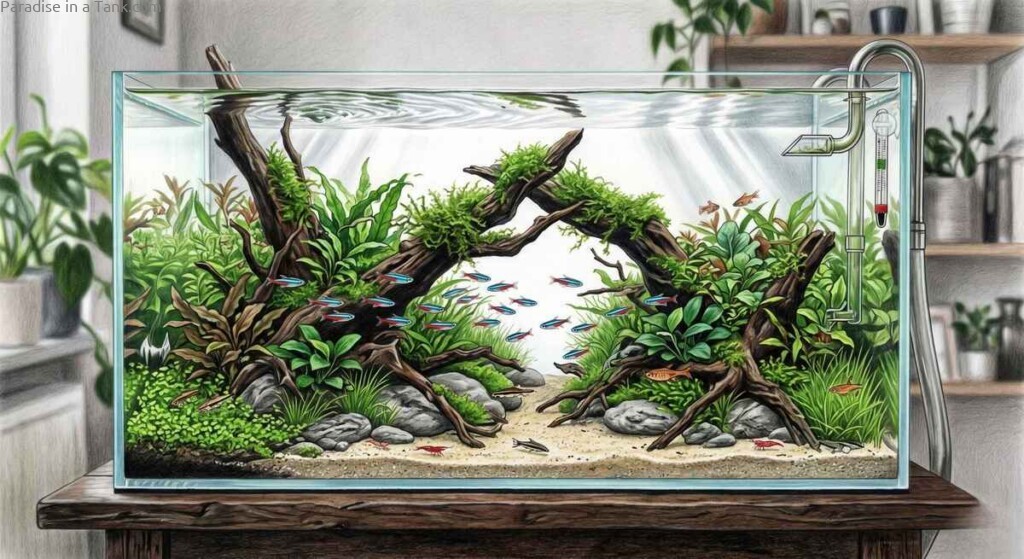
Finally, finish your system with high-quality artificial decorations, natural rocks, or real driftwood. These elements do not just beautify the environment, they fulfill the ancient evolutionary contract by providing secure hiding places so your fish feel completely safe. Deploy these foundational hardware strategies to build a highly stable, secure environment, and enjoy the peace of mind that comes with a perfectly optimized aquarium system. With the right gear running your ecosystem behind the scenes, you can stop stressing over sudden crashes and finally focus on the absolute joy of keeping your aquatic companions thriving for years to come.